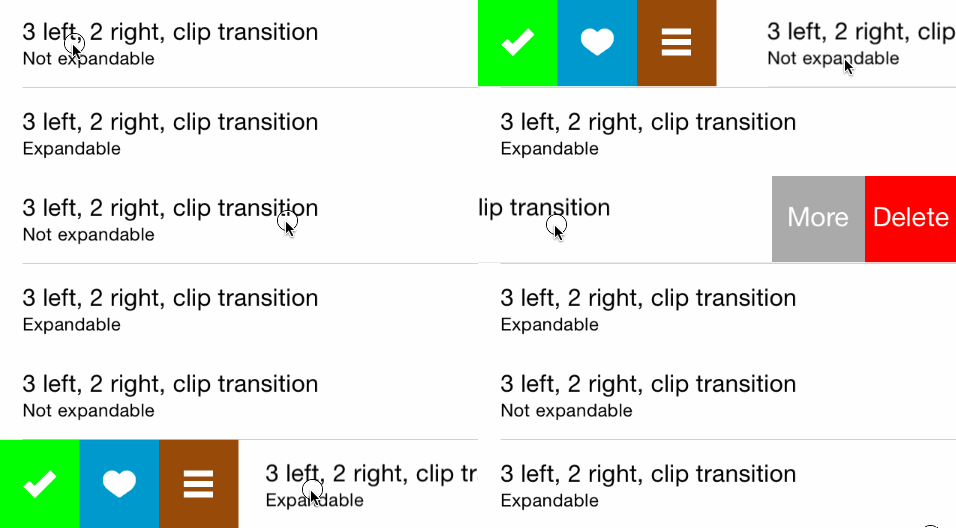
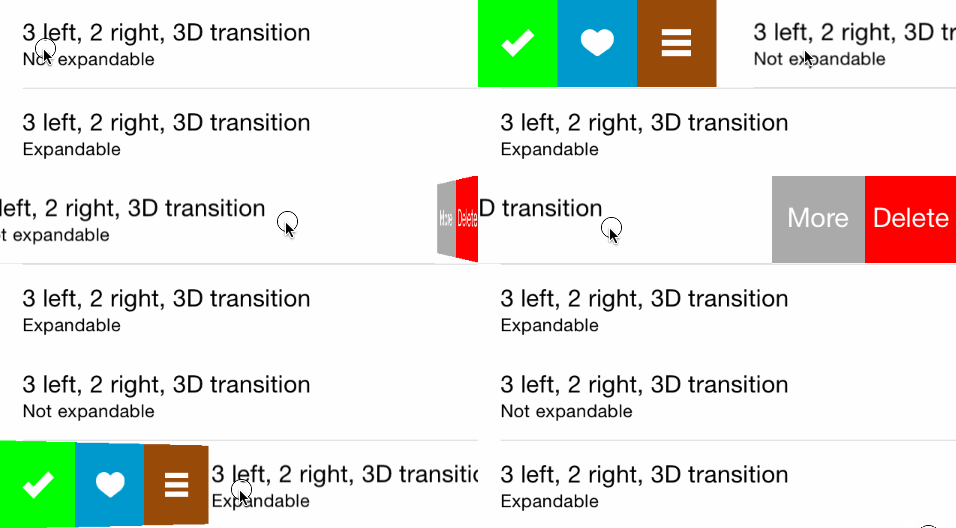
Um recurso muito interessante que vemos em muitos apps disponíveis na Apple Store é a possibilidade de deslizar a célula do tableView para a direita ou para a esquerda para habilitar as opções de ações para um determinado item.
Iremos aprimorar o nosso app Lista de Pendências para possibilitar editar e excluir uma pendência ao deslizarmos a mesma para a esquerda e a opção de mudar o status ao deslizar para a direita. O app Lista de Pendências pode ser encontrado neste post.
O recurso de adicionar botões de ação ao UITableViewCell é um pouco limitado no iOS então iremos utilizar o pod MGSwipeTableCell para nos auxiliar na implementação desta funcionalidade.
Instalando o MGSwipeTableCell
A biblioteca MGSwipeTableCell está disponível para ser instalada via CocoaPods com o comando pod 'MGSwipeTableCell' conforme exemplo abaixo.
# Uncomment this line to define a global platform for your project
platform :ios, '9.0'

target 'MGSwipeTableCellExample' do
  # Comment this line if you're not using Swift and don't want to use dynamic frameworks
  use_frameworks!

  # Pods for MGSwipeTableCellExample
  pod 'DZNEmptyDataSet'
  pod 'MGSwipeTableCell'
end
Para mais informações sobre o CocoaPods visite este post.
O MGSwipeTableCell disponibiliza as seguintes opções de transição ao deslizar a célula:
-
Border transition

-
Clip transition

-
3D transition

-
Static transition

-
Drag transition

Alterando o projeto Lista de pendências
Começaremos alterando o fonte ToDoItemTableViewCell.swift para que nossa UITableViewCell herde do MGSwipeTableCell. Altere o fonte conforme o exemplo abaixo.
import MGSwipeTableCellclass ToDoItemTableViewCell: MGSwipeTableCell {Agora iremos fazer algumas alterações na classe ViewController para implementar o protocolo MGSwipeTableCellDelegate.
O protocolo MGSwipeTableCellDelegate possui os seguintes métodos:
swipeTableCell(_:canSwipe:)swipeTableCell(_:didChangeSwipeState:gestureIsActive)swipeTableCell(_:tappedButtonAtIndex:direction:fromExpansion:)swipeTableCell(_:swipeButtonsForDirection:swipeSettings:expansionSettings:)swipeTableCell(_:shouldHideSwipeOnTap:)swipeTableCellWillBeginSwiping(_:)swipeTableCellWillEndSwiping(_:)
Iremos implementar dois deles no nosso projeto.
No método swipeTableCell(_:swipeButtonsForDirection:swipeSettings:expansionSettings:) iremos criar os botões da nossa célula. Utilizaremos a classe MGSwipeButton para criar os botões.
Com o parâmetro direction podemos separar os botões que serão criados ao deslizar para a direita e para a esquerda. Do lado esquerdo teremos um botão para marcar a pendência como concluída. Caso o usuário deslize o botão até o meio o mesmo será ativado. Informamos isto com a propriedade enableSwipeBounces do parâmetro swipeSettings igual a true. Também precisamos informar o índice do botão que será ativado. No nosso caso temos apenas um botão e o índice será zero.
Do lado direito criaremos dois botões. Um para editar e um para excluir. O botão para excluir será ativado ao deslizar a célula até o meio da célula.
O método espera um array com o botões criados como retorno.


Imagens de Yannick Lung
// MARK: -
extension ViewController: MGSwipeTableCellDelegate {
  // MARK: - MGSwipeTableCellDelegate
  func swipeTableCell(cell: MGSwipeTableCell!, swipeButtonsForDirection direction: MGSwipeDirection, swipeSettings: MGSwipeSettings!, expansionSettings: MGSwipeExpansionSettings!) -> [AnyObject]! {
    switch direction {
      case .LeftToRight:
        // configure left buttons
        let checkButton = MGSwipeButton(title: "", icon: UIImage(named:"clipboard-checked"), backgroundColor: UIColor.greenColor())
        checkButton.tintColor = UIColor.blackColor()

        swipeSettings.transition = .Border
        swipeSettings.enableSwipeBounces = true

        expansionSettings.buttonIndex = 0

        return [ checkButton ]
      case .RightToLeft:
        // configure right buttons
        let editButton = MGSwipeButton(title: "", icon: UIImage(named: "clipboard-edit"), backgroundColor: UIColor.blueColor())
        editButton.tintColor = UIColor.whiteColor()
        let deleteButton = MGSwipeButton(title: "", icon: UIImage(named: "clipboard-remove"), backgroundColor: UIColor.redColor())
        deleteButton.tintColor = UIColor.whiteColor()

        swipeSettings.transition = .Border
        swipeSettings.enableSwipeBounces = true

        expansionSettings.buttonIndex = 0

        return [ deleteButton, editButton ]
    }
  }
}
O outro método que iremos utilizar é o swipeTableCell(_:tappedButtonAtIndex:direction:fromExpansion:). Nele iremos definir as ações que serão realizadas ao ativar os botões das células. Primeiramente verificamos a direção do deslizamento e depois o índice do botão para saber qual ação será executada.
Renomearemos o método updateItem(_:) para checkItem(_:) e criaremos os métodos deleteItem(_:) e editItemAction(_:).
func swipeTableCell(cell: MGSwipeTableCell!, tappedButtonAtIndex index: Int, direction: MGSwipeDirection, fromExpansion: Bool) -> Bool {
  if let indexPath = tableView.indexPathForCell(cell) {
    switch direction {
      case .LeftToRight:
        checkItem(indexPath)
      case .RightToLeft:
        if index == 0 {
          deleteItem(indexPath)
        } else if index == 1 {
          editItemAction(indexPath)
        } else {
          return false
        }
    }
  }

  return true
}
Os métodos auxiliares ficaram:
func editItemAction(indexPath: NSIndexPath) {
  let oldItem = selectItem(indexPath)
  let alert = UIAlertController(title: NSLocalizedString("ToDoList.Edit.title", value: "Editing To Do Item", comment: ""),
                                message: nil,
                                preferredStyle: .Alert)
  alert.addTextFieldWithConfigurationHandler { $0.text = oldItem.item }

  alert.addAction(UIAlertAction(title: NSLocalizedString("ToDoList.Add.Cancel", value: "Cancel", comment: ""), style: .Cancel, handler: nil))

  alert.addAction(UIAlertAction(title: NSLocalizedString("ToDoList.Add.OK", value: "Ok", comment: ""), style: .Default) { [unowned self, alert] _ in
    let newItem = ToDoItem(item: alert.textFields![0].text!, finalized: oldItem.finalized)
    self.editItem(oldItem, newItem: newItem)
  })

  alert.popoverPresentationController?.barButtonItem = navigationItem.rightBarButtonItem

  presentViewController(alert, animated: true, completion: nil)
}
func editItem(olditem: ToDoItem, newItem: ToDoItem) {
if let index = toDoList.indexOf(olditem) {
toDoList[index] = newItem
saveToDoList()
}
}func deleteItem(indexPath: NSIndexPath) {
let item = selectItem(indexPath)
if let index = toDoList.indexOf(item) {
toDoList.removeAtIndex(index)
saveToDoList()
}
}func checkItem(indexPath: NSIndexPath) {
let item = selectItem(indexPath)
if let index = toDoList.indexOf(item) {
item.finalized = !item.finalized
toDoList[index] = item
saveToDoList()
}
}Também precisaremos alterar o método tableView(_:cellForRowAtIndexPath:) do protocolo UITableViewDataSource para definirmos a classe ViewController como delegate da célula ToDoItemTableViewCell.
func tableView(tableView: UITableView, cellForRowAtIndexPath indexPath: NSIndexPath) -> UITableViewCell {
  let cell = tableView.dequeueReusableCellWithIdentifier(cellName) as! ToDoItemTableViewCell
  let item = selectItem(indexPath)

  cell.fillCell(item)

  cell.delegate = self

  return cell
}
Utilizando o MGSwipeTableCell sem protocolo
Alternativamente é possível utilizar o MGSwipeTableCell sem implementar o protocolo MGSwipeTableCellDelegate. Para isto basta definir os botões com as suas respectivas closures diretamente no método tableView(_:cellForRowAtIndexPath:) do protocolo UITableViewDataSource.
func tableView(tableView: UITableView, cellForRowAtIndexPath indexPath: NSIndexPath) -> UITableViewCell {
  let cell = tableView.dequeueReusableCellWithIdentifier(cellName) as! ToDoItemTableViewCell
  let item = selectItem(indexPath)

  cell.fillCell(item)

  cell.delegate = self

  //configure left buttons
  let checkButton = MGSwipeButton(title: "", icon: UIImage(named:"clipboard-checked"), backgroundColor: UIColor.greenColor()) { [ weak self ] (sender: MGSwipeTableCell!) -> Bool in
    if let strongSelf = self,
        let indexPath = tableView.indexPathForCell(sender) {
      strongSelf.checkItem(indexPath)

      return true
    }

    return false
  }
  checkButton.tintColor = UIColor.blackColor()

  cell.leftButtons = [ checkButton ]
  cell.leftSwipeSettings.transition = .Border

  //configure right buttons
  let editButton = MGSwipeButton(title: "", icon: UIImage(named: "clipboard-edit"), backgroundColor: UIColor.blueColor()) { [ weak self ] (sender: MGSwipeTableCell!) -> Bool in
    if let strongSelf = self,
        let indexPath = tableView.indexPathForCell(sender) {
      strongSelf.editItemAction(indexPath)

      return true
    }

    return false
  }
  editButton.tintColor = UIColor.whiteColor()

  let deleteButton = MGSwipeButton(title: "", icon: UIImage(named: "clipboard-remove"), backgroundColor: UIColor.redColor()) { [ weak self ] (sender: MGSwipeTableCell!) -> Bool in
    if let strongSelf = self,
        let indexPath = tableView.indexPathForCell(sender) {
      strongSelf.deleteItem(indexPath)

      return true
    }

    return false
  }
  deleteButton.tintColor = UIColor.whiteColor()

  cell.rightButtons = [ deleteButton, editButton ]
  cell.rightSwipeSettings.transition = .Border

  return cell
}
Conclusão
Veja como ficou a nossa Lista de Pendências.
Utilizando o delegate melhoramos o uso de memória uma vez que os botões só serão criados conforme necessidade.
Espero que tenha gostado do tutorial. Caso tenha alguma dúvida crítica ou sugestão de novos pods a serem mostrados aqui no blog deixe a sua mensagem abaixo. Se gostou compartilhe.
Caso queira entrar em contato pode me chamar no Twitter @mateusfsilva.


